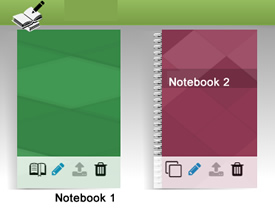
Create your original educational content. Tap the ![]() icon on the top-right menu of the Publior App home page. The shelf that appears includes all the notebooks you (will) have created. With each new teacher registration, a notebook is automatically created. You can edit your notebook, and add or remove chapters and material by tapping the Pencil icon on the cover. The HTLM and ePUB notebooks have a spiral on their cover (see Notebook 2). All others are PDF notebooks (Notebook 1).
icon on the top-right menu of the Publior App home page. The shelf that appears includes all the notebooks you (will) have created. With each new teacher registration, a notebook is automatically created. You can edit your notebook, and add or remove chapters and material by tapping the Pencil icon on the cover. The HTLM and ePUB notebooks have a spiral on their cover (see Notebook 2). All others are PDF notebooks (Notebook 1).
Note that PDF notebooks’ content cannot be changed by a teacher’s account. This feature is only offered to publishers and Publior-affiliated teachers (Publior Author app).
The notebook you create, using the authoring tool of your account, automatically appears on the MY BOOKS shelf on your application’s home page.
Each Notebook in the authoring library has 4 buttons (functions) on its cover:
- Edit: To edit a notebook, tap the Pencil
 on its cover.
 - View: Tap the Open Book
 icon or (Open notebook
  icon) for a preview. This function allows you to review it before making it available for sale or use by your already connected students.
 - Publish: Click the Upload
 icon to request the generation of sales codes for your completed notebook.
 - Delete: In case you want to delete your creation, click on the Trash Cart
 .
.
All the original content (notebooks) created by individual educators can be exchanged with colleagues either for personal or shared viewing with their students or with full editing and copying rights. Additionally, the creator can choose to have the content open or closed to their students. All of the above options are set in the Manage Access Rights section, just above the book’s chapters. On the right side of the tab, the teacher can fill in the usernames of the colleagues they want to share their content with. (See more in section 3.5)
If you wish to add a new notebook, go to the Authoring Tool ![]() located on your home page open the menu on the left (orange checkmark) > click Add New notebook
located on your home page open the menu on the left (orange checkmark) > click Add New notebook ![]() . Select the notebook type you are interested in creating, enter a title, and tap Save to continue. In the new window add chapters either individually (Add New Chapter) or collectively (Create Chapters). Once again you are given the chance to fill in the chapter titles (an automatic title pasting tool was presented earlier in this process) and click Save. From now on, you can add material by clicking the + icon on the top-right side of each chapter.
. Select the notebook type you are interested in creating, enter a title, and tap Save to continue. In the new window add chapters either individually (Add New Chapter) or collectively (Create Chapters). Once again you are given the chance to fill in the chapter titles (an automatic title pasting tool was presented earlier in this process) and click Save. From now on, you can add material by clicking the + icon on the top-right side of each chapter.
The chapters you create within each notebook can be moved in any direction: up, down, and to the right or left when they need to be declared as subchapters in the immediately preceding chapter. Up to three levels of subchapters can be defined. To manage chapters and subchapters, hold down the title and drag.
As long as all the contents of the Notebook are shared with your students (check all green boxes per content), they are also displayed in the Lesson administration![]() management tool of the lesson in which you have included the Notebook. (See how to integrate a notebook or book into a lesson in section 2.1.)
management tool of the lesson in which you have included the Notebook. (See how to integrate a notebook or book into a lesson in section 2.1.)
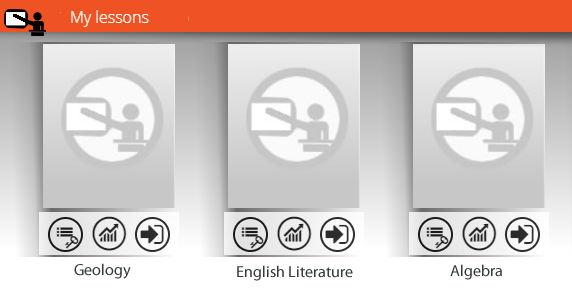
By clicking on the ![]() icon on the lesson card you can select the partial display/hiding of the contents of your notebook by activating for this lesson the Notebook Content Visibility Manager. View your contents for the lesson progressively.
icon on the lesson card you can select the partial display/hiding of the contents of your notebook by activating for this lesson the Notebook Content Visibility Manager. View your contents for the lesson progressively.
A new income!
Have you written educational content that could interest students or teachers to purchase? Click the ![]() icon on the cover of the Textbook you wish to publish. Enter the sales/activation codes you will need. Publior’s editorial team will contact you to suggest various ways to promote and sell your material. For accredited partner educators, Publior provides the ability to author and enrich a PDF file in the Publior Author application. Find information on the cost of publishing books and notebooks at www.publior.com
icon on the cover of the Textbook you wish to publish. Enter the sales/activation codes you will need. Publior’s editorial team will contact you to suggest various ways to promote and sell your material. For accredited partner educators, Publior provides the ability to author and enrich a PDF file in the Publior Author application. Find information on the cost of publishing books and notebooks at www.publior.com