Notebooks created by educators consist of their exercises grouped into chapters.
SCORM: Clickon the home page’s top-right menu to enter your Authoring Tool ![]() . Tap the Pencil
. Tap the Pencil ![]() on the cover of the notebook you wish to edit. Choose Detailed View of Settings. Export in SCROM by checking the corresponding gray checkbox. This option is available in every exercise able to be exported in SCROM format. Select all content you wish to export in such format and click Export. You can save the zip file on your device’s hard drive.
on the cover of the notebook you wish to edit. Choose Detailed View of Settings. Export in SCROM by checking the corresponding gray checkbox. This option is available in every exercise able to be exported in SCROM format. Select all content you wish to export in such format and click Export. You can save the zip file on your device’s hard drive.
SHARING: While you are on Editing Mode using your Authoring Tool for a notebook, there is an Available for Sharing field, located on the right side of your screen. Check the option and enter in the first field the username of the educator to whom you wish to loan your created educational material. Your notebook will automatically appear on their bookshelf. Your username will be listed below its cover. ![]()
The contents of your (shared) Notebooks will not be assignable to your colleague’s students. They will only be viewable. Any changes you make to your Notebooks will automatically appear in the borrowed Notebooks. To stop sharing, delete the colleague’s username from the Available to Share field. To stop the viewing of borrowed notebooks, you can also uncheck the Available to Share option without deleting the usernames.
f there are notebooks on your shelf that you have loaned, then the number of people you have shared it with is displayed under the notebook’s cover: ![]()
You can even fully forward your educational material to a colleague for copying. Enter your colleague’s username in the second Available to Share field.
Caution: If the account is free, data may be lost due to a lack of storage space.
All the contents of your Notebook have various colored boxes to the left of them within the chapters.
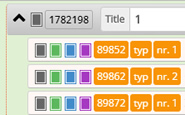
Check the gray boxes of the contents you wish to save in a SCROM format.
Check the green boxes of the contents you wish to make available to your students. Then you can optionally manage the display of the checked contents on a per-course basis. Click the ![]() icon on the course tab and manage the Visibility of your notebook content in that course.
icon on the course tab and manage the Visibility of your notebook content in that course.
Check the blue boxes of the contents you wish to share. When the colleague whose username you have entered in the first Available to Share field opens your notebook, only the contents you have checked here will be displayed to them.
Check the violet boxes of the contents you wish to share for copying. The colleague, whose username you have entered in the second Available to Share field, will be able to create a new notebook of their own using the contents you have checked here. The teacher will click the icon on a chapter of their new notebook and select Copy from Existing Material.