Clickon the home page’s top-right menu to enter your Authoring Tool ![]() .
.
Tap the Pencil ![]() on the cover of the notebook to which you wish to add an interactive exercise.
on the cover of the notebook to which you wish to add an interactive exercise.
Tap the icon on the chapter’s title you wish to add the material. Select Add Exercise. Select exercise type, create an exercise, and once you are finished click Save.
The following functions apply to almost all exercises:
INPUT FIELDS: When you create an exercise you can…
– Add the required skills for an exercise in its Public Etiquette field (optional)
– Add a title (required)
– Describe & give instructions for your exercise in the main text editor (Basic Content). It is located at the very bottom of the same editing page (required).
– Save or Save & Preview to check that it’s working properly.
EMBEDDED VIDEO – DISPLAYED WITHIN THE EXERCISE: Insert the desired video in the Example field. Click the ![]() icon and fill in your video’s URL.
icon and fill in your video’s URL.
CLOSED VIDEO – OPENED MANUALLY OVER THE EXERCISE: Insert video and audio clips in their respective fields (Video, Audio). Type a multimedia title (e.g., video 123) in the text editor and hyperlink by clicking the ![]() icon. In the new dialog box fill in the location of the file (upload it to the server or copy the file address) e.g. https://domainname/filename.mp4, filename.ogv – filename.mp3, filename.ogg (see more on importing video and audio files in 3.8)
icon. In the new dialog box fill in the location of the file (upload it to the server or copy the file address) e.g. https://domainname/filename.mp4, filename.ogv – filename.mp3, filename.ogg (see more on importing video and audio files in 3.8)
ANCIENT GREEK: Find in almost every exercise type the function to add Special Symbols via virtual keyboard. Select Virtual Keyboard language: Ancient Greek. Students will have a virtual keyboard at their disposal, which they can activate to fill in a special character, e.g. in a fill-in-the-blank exercise. A long press on a character opens up more letters to choose from. Find in the exercise settings more virtual keyboard languages.
RECORD AN EXERCISE DESCRIPTION: In the TITLE field open the Tool Menu. Press the Microphone and then REC to record. The function is suitable for spelling exercises, among others.
ADD REASONING: At the end of the creation of each exercise is a Reasoning checkbox. If activated, the student will be asked to justify the answer given to the questions of the exercise. Note that when sending assignments, you also have the option to turn on the Self-assessment Question field per exercise. Both of these optional features provide you with a better insight into the student’s choices (justification), especially when comparing their estimation of their results with their actual performance (self-assessment).
COPY-PASTING FROM EXTERNAL SOURCES: If you copy-paste from .doc, .pdf files, or from the internet put the text in a Notepad (most devices have a Notepad Application) first. This ensures that no bugs or extra hidden text are transferred besides the desired content. Then you can copy the text from your Notepad and paste it into the exercise. Please do not copy content for which you do not have the legally required rights of use.
EXAMINATIONS AND PRESENTATIONS: refer to paragraph 3.8.
The following is a detailed description of the available types of exercises.
EXERCISE TYPES:
1. True/False
Fill in the exercise content in the BASIC CONTENT field. For each word/phrase that should be selected as false, tag it with the style False. The word/phrase that is true should be tagged using the style True. If you do not wish to select a word or phrase for tagging – i.e. display only a checkbox without a tag – then use 2 @@ symbols and tag them with the desired style.
Caution: Use separate paragraphs for each query for both true and false options.
2. Multiple choice (single correct answer)
Fill in the exercise content in the BASIC CONTENT field. For each word/phrase that should be selected as false, tag it with the style False. The word/phrase that is true should be tagged using the style True. If you do not wish to select a word or phrase for tagging – i.e. display only a checkbox without a tag – then use 2 @@ symbols and tag them with the desired style.
Caution: Use separate paragraphs for each question, which can only have one correct answer.
3. Multiple choice (multiple correct answers)
Fill in the exercise content in the BASIC CONTENT field. For each word/phrase that should be selected as false, tag it with the style False. The word/phrase that is true should be tagged using the style True. If you do not wish to select a word or phrase for tagging – i.e. display only a checkbox without a tag – then use 2 @@ symbols and tag them with the desired style.
Additional settings: For each incorrect answer one correct answer can be removed.
Caution: It is suggested that you use separate paragraphs for each question, which may have more than one correct answer. Following this method, an accurate marking per question is always achieved. To create a paragraph, press Enter within the text editor field. Each paragraph appears as a P field.
4. Fill in the gaps
FILL IN: In the BASIC CONTENT, fill in your text. For each blank gap, you want to have, use 2 consecutive underline symbols __. Use at least 2 underscore marks for each space anywhere in the text flow. Then add your answers for each blank in the opposite ANSWERS window.
Caution: Answers should be written line by line and in order of appearance.
- To have alternate correct answers for each blank, separate them using a pipe character (|). E.g. bruder|brueder without a space in between.
- To accept answers which will not be counted in the final score, enter 3 hashtags (###) as an answer in the corresponding line of the ANSWERS window.
- To accept blank answers that MUST be counted in the score, enter 2 hashtags (##) as an answer in the corresponding line of the ANSWERS window.
- If the answer is a number within a certain range e.g. between 10 and 50 or 2.50 and 4.50 then enter the range as follows: {2.50~4.50}. Any number in between will be considered a correct answer.
Enable the virtual keyboard in case your students will need to use special characters or a specific language, that probably do not have installed on their device.
Caution: Do not leave blank lines at the end of the answer sequence in the ANSWERS window.
TOOLTIP: You can create a Tooltip Window for each blank gap, that will open when the user places the cursor on the gap. Write in the ANSWERS field without spaces e.g. B,POPWINDOW:A,B,G,D where B would be the correct answer. You can also use 3 hashtags (###,POPWINDOW:10,20,3) so that whatever the student chooses will not count in the final score. If you enter 2 hashtags (##,POPWINDOW:10,20,3) any choice made by the student will be considered incorrect. That is, the cell must remain blank. You can change the appearance of the Tooltip Window by selecting another display icon in the exercise settings.
5. Combination: Fill in – Multiple choice
FILL IN: In the BASIC CONTENT, fill in your text. For each blank gap, you want to have, use 2 consecutive underline symbols __. Use at least 2 underscore marks for each space anywhere in the text flow. Then add your answers for each blank in the opposite ANSWERS window.
Caution: Answers should be written line by line and in order of appearance.
- To have alternate correct answers for each blank, separate them using a pipe character (|). E.g. bruder|brueder without a space in between.
- To accept answers which will not be counted in the final score, enter 3 hashtags (###) as an answer in the corresponding line of the ANSWERS window.
- To accept blank answers that MUST be counted in the score, enter 2 hashtags (##) as an answer in the corresponding line of the ANSWERS window.
- If the answer is a number within a certain range e.g. between 10 and 50 or 2.50 and 4.50 then enter the range as follows: {2.50~4.50}. Any number in between will be considered a correct answer.
Enable the virtual keyboard in case your students will need to use special characters or a specific language, that probably do not have installed on their device.
Caution: Answers should be written line by line and in order of appearance.
TOOLTIP: You can create a Tooltip Window for each blank gap, that will open when the user places the cursor on the gap. Write in the ANSWERS field without spaces e.g. B,POPWINDOW:A,B,G,D where B would be the correct answer. You can also use 3 hashtags (###,POPWINDOW:10,20,3) so that whatever the student chooses will not count in the final score. If you enter 2 hashtags (##,POPWINDOW:10,20,3) any choice made by the student will be considered incorrect. That is, the cell must remain blank. You can change the appearance of the Tooltip Window by selecting another display icon in the exercise settings.
Caution: Answers should be written line by line and in order of appearance.
SELECTION: Fill in the exercise content in the BASIC CONTENT field. For each word/phrase that should be selected as false, tag it with the style False. The word/phrase that is true should be tagged using the style True. If you do not wish to select a word or phrase for tagging – i.e. display only a checkbox without a tag – then use 2 @@ symbols and tag them with the desired style.
Additional settings: For each incorrect answer one correct answer can be removed.
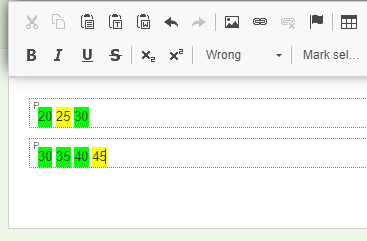
Tip: To quickly create an interactive exercise with long texts: e.g. Find and circle the verbs in the text
- Write or copy-paste your text into the Basic Content.
- Mark the whole text.
- Open Mark Selection as from the menu.
- Select Wrong per Word. Each word will be considered wrong.
- Then deselect the verbs by double-clicking on each verb and selecting style False so that they are no longer colored yellow.
- Re-mark each verb individually by selecting True.
- Choose in the settings to not show checkboxes and select the Underline as options’ style.
Students will be asked to find and underline the verbs in the text with a simple mouse click or touch of their finger depending on their device!
Use two underscores just after each word to add choice questions: e.g. after locating (underlining) the verb, choose voice: Active, Passive … (see the TOOLTIP above for settings)
Caution: It is suggested that you use separate paragraphs if you have several different questions that you want to score following a specific grouping. It is also suggested that you use negative scoring. That is, set the exercise to deduct one point from the correct answers for each wrong answer. This way you can easily identify students who click on all the words.
6. Drag and Drop
Fill in the exercise content in the BASIC CONTENT field. For each word/phrase to be transposed, mark it with the DragnDrop style. For words that do not need to be transferred and will be used as “traps”, mark them with the DragnDrop dummy style.
7. Dropdown
Fill in the exercise content in the BASIC CONTENT field. Place at least 2 underscore symbols (_) at the point in the text where the drop-down menus should appear. Then add the options/answers for each menu in the ANSWER window. The options should be written line by line and in order of appearance. Separate your options without spaces with a pipe character (|) and highlight the correct answer choice using the Correct Word style. e.g. round|square.
Caution: Do not leave blank lines at the end of the answer sequence in the ANSWERS window.
8. Creative Writing
You can (optionally) enter a small text or instructions in the BASIC CONTENT and then choose its display settings. Additionally, you can (optionally) enter an example answer in the REQUESTED ANSWER field. This text will be compared with the text produced by the student. The system calculates a percentage of relevance between the two texts and automatically provides an indirect auxiliary score. It is recommended that you select the Compare Response display when sending spelling exercises accompanied by audio files. This type of exercise is also suitable for situations where the exercise cannot be easily turned into interactive either because it is too complex or because it is based on a photograph. It is suggested to upload a photo of the exercise in the BASIC CONTENT. Double-click on the photo. In the new dialog box, click Advanced. In the Stylesheet Classes field, enter the term forcanvas. When you send the exercise as an assignment, students will receive it within the word processor in which they are normally required to write. They click the Canvas ![]() icon and write or draw on the photo you sent them. They then click theicon to save their work to the cloud
icon and write or draw on the photo you sent them. They then click theicon to save their work to the cloud ![]() .
.
9. Match Pairs
Fill in the items that are matched, in the two opposite columns of the BASIC CONTENT. The elements can be numbers, words, or even photos. The items must be entered one per line and in the correct matching order. If an item in the first column matches two items in the second column, then in the second/right column you must separate the matches with a pipe character (|) with no spaces in between.
Caution: Do not leave blank lines at the end of the answers/matches sequence.
10. Place in Groups
Select the number of groups > fill in the words or pictures belonging to each group in their respective fields in the authoring tool.
Caution: The words or photos must be entered one per line.
11. Reorder words/phrases
Go to the BASIC CONTENT, and fill in your text in the correct order. If you want to create a sub-paragraph e.g. for a dialogue exercise, press Shift and Enter simultaneously. Mark the individual sections to be shuffled using the Mark as Part style. If some parts of the text need to remain fixed as they are, mark them, and choose the Mark as unmoveable Part style.
12. Image-based
Select the type of interaction: find elements, fill in the blank, drag ‘n drop. Then click Select Image and load the image. Create points or shapes (rectangles, circles, polygons) on the image. Fill in the fields resulting from the shapes. Whatever you fill in the blank fields will be what your students will have to fill in the blanks on the picture during the exercise. This can be either by filling in or by dragging and dropping items.
Caution: Delete any redundant spaces.
13. Image-based v2
Select the type of interaction: find elements, fill in the blank, drag ‘n drop. Then click Select Image and load the image. Create points or shapes (rectangles, circles, polygons) on the image. Fill in the Name field in the dialog box which appears after each new shape you create on the image. Whatever you fill in the blank fields will be what your students will have to fill in the blanks on the picture during the exercise. This can be either by filling in or by dragging and dropping items.
14. Questionnaires
Create questionnaires that can be used as a research tool. Follow steps 1, 2, and 3 to create a question. Create new questions or copy and edit previous questions. If you send the questionnaire as an assignment, you can pull the aggregate responses of all the statistics of any individual student who completed it by clicking on the ![]() icon. You can view the results either by percentage or by actual numbers of participants. You can change that at the bottom-right settings.
icon. You can view the results either by percentage or by actual numbers of participants. You can change that at the bottom-right settings.
15. Word Search puzzle
Create a cryptogram. The goal is to identify specific words hidden in a wide rectangular grid of letters. Enter words in the BASIC CONTENT field. Words should be entered one per line. Select an orientation for the placement of words in the general grid. Each time the student opens the exercise, the cryptogram is automatically re-generated.
16. Crossword
Calculate the crossword’s size in boxes ( horizontally -maximum width- and vertically -maximum height). Create the crossword as a large square consisting of hashtags (#). Each copy of the symbol represents one box. Place the appropriate number of # horizontally and vertically. Then fill in the required words by replacing the symbols with letters.
Numbering: When finished, click open crossword preview. In the exercise’s preview, you may view the automatic numbering of the requested words. Write the horizontal and vertical clues in the corresponding fields, always starting with the number given by the system.
Example: for the horizontal word with the number 4, write: clue for the 4th word
If you wish to create your numbering, put at the beginning of the word in the crossword the number you wish (e.g. 1) to replace the automatic number 4. You can declare the change as follows: 4#1# clue for the word
17. Enriched text content (HTML)
Add content with or without hyperlinks.
18. Flashcards
Fill the two facing columns of the BASIC CONTENT with the corresponding items. The elements can be numbers, words, or even photographs. The items must be entered one per line and in the correct order of matching.
Caution: Do not leave blank lines at the end of the answers/matches sequence.
Below you can find several types of exercises which are currently under construction;
Mind map
Timeline
Infographic
Interactions as a board game
Collaborative (notebooks & joint presentation)